
User Guide
Connecting Your CCTV to CCTV Guard AI
A step-by-step guide for beginners: from finding the RTSP address on your DVR/NVR and connecting your CCTV to the internet, to seeing your cameras on your phone, watched over by AI.
Download the Guide (PDF)In short, just 5 steps
- Install the app & get an account Section 2
- Choose a plan & pay Section 3
- Note your DVR details: IP, user, password, port Sections 4–5
- Open internet access: port forwarding or Tunnel Box Sections 6–7
- Enter the RTSP address in the app Section 8
Contents
- Getting Started: How It Works & What You Need
- Install the App & Sign In
- Choose a Plan & Pay
- Understanding the RTSP Address
- Finding the RTSP Details on Your DVR/NVR
- Making Your DVR Reachable from the Internet
- Testing the RTSP Address with VLC
- Adding Cameras to the App
- Everyday Use
- Common Problems & Solutions
- Need Help?
Markers 1 2 3 show the order of the parts to look at or tap. Images marked ILLUSTRATION are redrawn device menus; the screen on your device may differ slightly depending on its version.
About the screenshots: the app screenshots in this guide show the Indonesian interface. Labels are written exactly as they appear on screen, followed by their meaning, for example Simpan (Save). You can switch the app language in Pengaturan ▸ Bahasa (Settings ▸ Language); some screens stay in Indonesian.
Section 1
Getting Started: How It Works & What You Need
CCTV Guard AI does not replace your CCTV. Your existing cameras and DVR/NVR stay in place. Our server “watches” the live feed from your DVR over the internet, analyses it with AI (for example detecting fire, intruders or unknown people), and sends alerts to your phone.
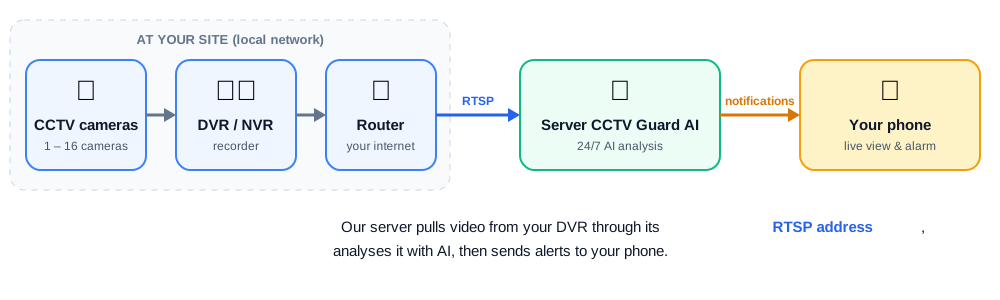
What you need
- CCTV with a DVR or NVR that is already recording normally. Standalone IP cameras (without a DVR) also work.
- The DVR/NVR connected to your internet router with a LAN cable.
- A stable internet connection at the CCTV site (IndiHome, Biznet, MyRepublic, First Media, etc.).
- The DVR username & password you use to open the DVR menu or its own app (Hik-Connect, DMSS, XMEye).
- An Android phone for the CCTV Guard AI app.
- For testing: a computer/laptop or a phone with the free VLC app.
Section 2
Install the App & Sign In
1 Download the app from Google Play
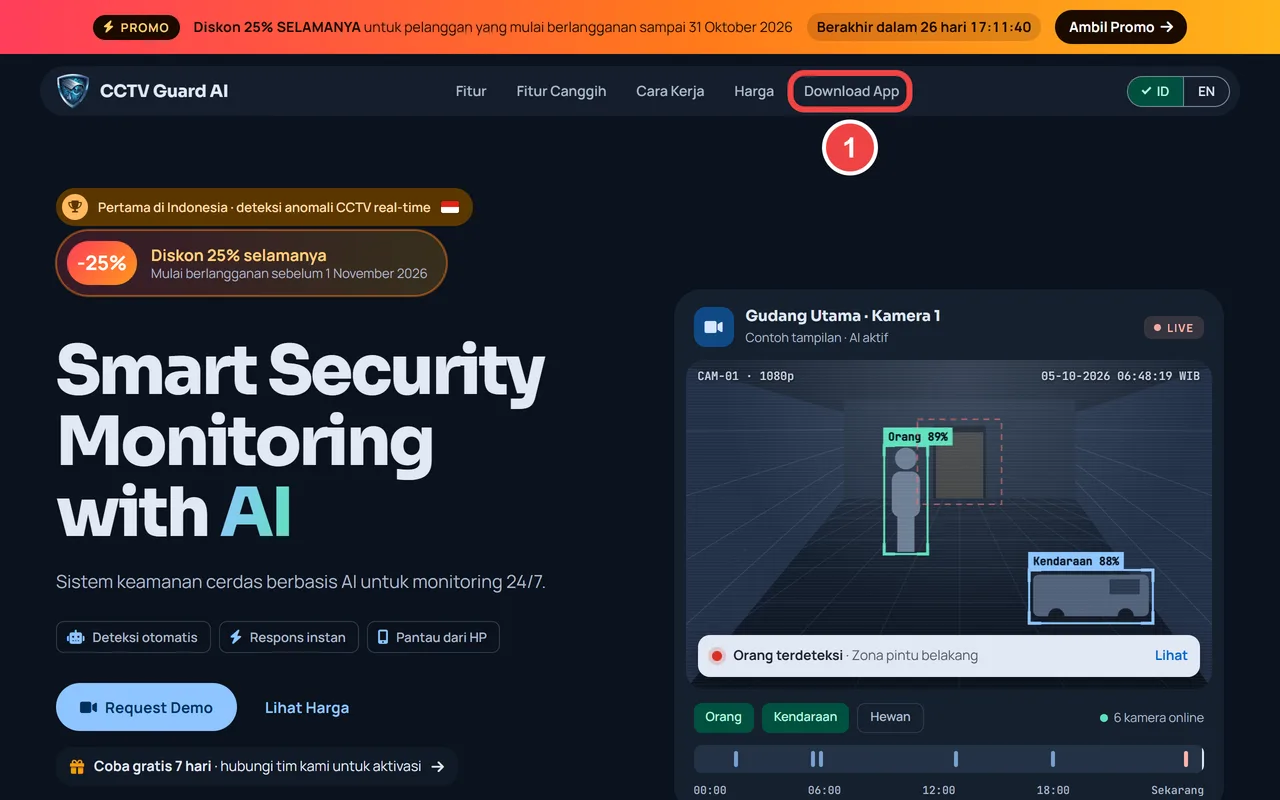
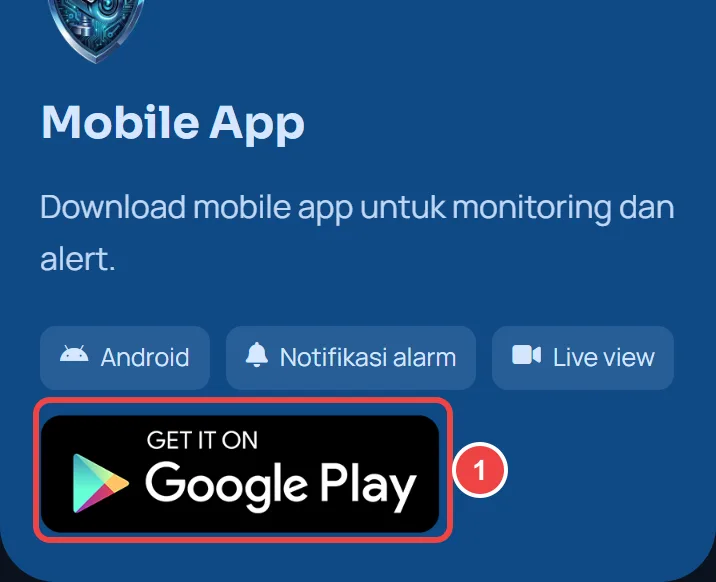
Open cctvguardai.com, tap Download App 1, then tap the Google Play button. You can also search for “CCTV Guard AI” in the Play Store.
2 Get an account & sign in
CCTV Guard AI accounts are created by our team:
- Contact us on WhatsApp +62 813-2345-9391. Tell us your name, email, WhatsApp number and site type (home, office, shophouse, warehouse or factory).
- We create your account and send the email/username and an initial password to your WhatsApp.
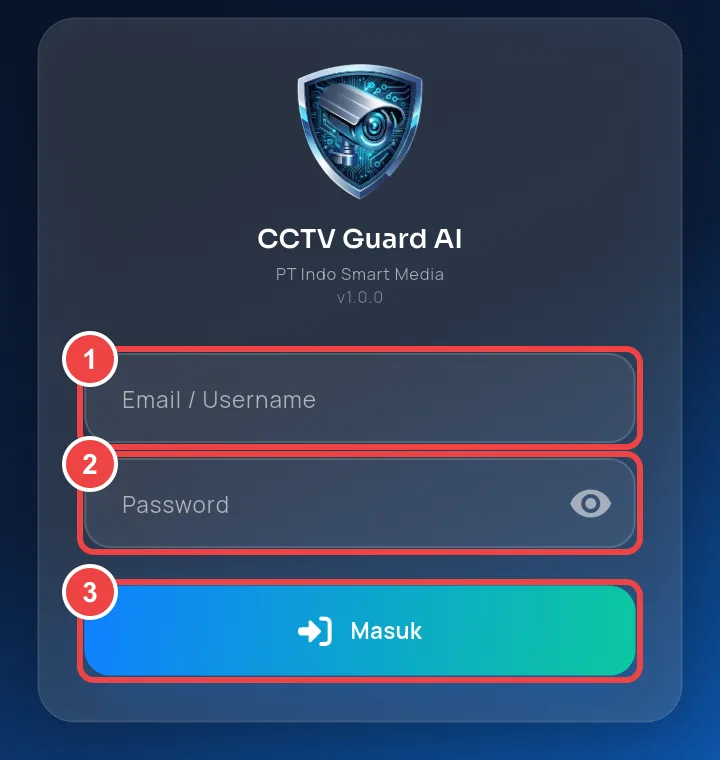
- Open the app, enter the Email / Username 1 and Password 2, then tap Masuk (Sign in) 3.
3 Get to know the main screen
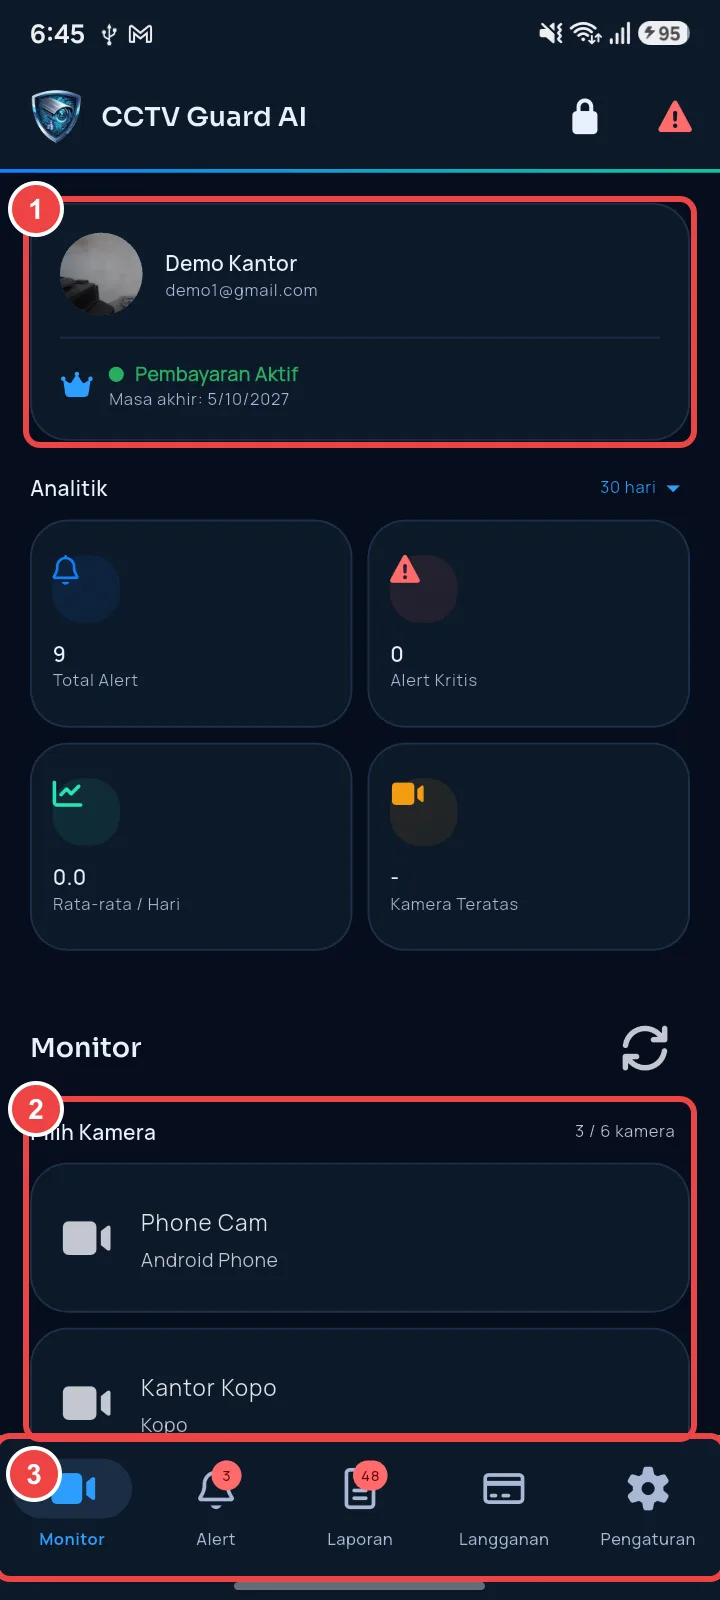
After signing in you land on the Monitor tab:
- 1 Profile card: your account name and plan status (“Pembayaran Aktif” — Payment Active — and its expiry date).
- 2 Camera list: your cameras and quota, for example “3 / 6 kamera” (3 of 6 cameras).
- 3 Bottom menu: Monitor, Alert, Laporan (Reports), Langganan (Subscription), Pengaturan (Settings).
On a new account the camera list is still empty. That is normal — cameras are added in Section 8.
Section 3
Choose a Plan & Pay
Plans are built to fit: you only pay for the number of cameras and the AI detection types you choose. All prices include VAT (PPN).
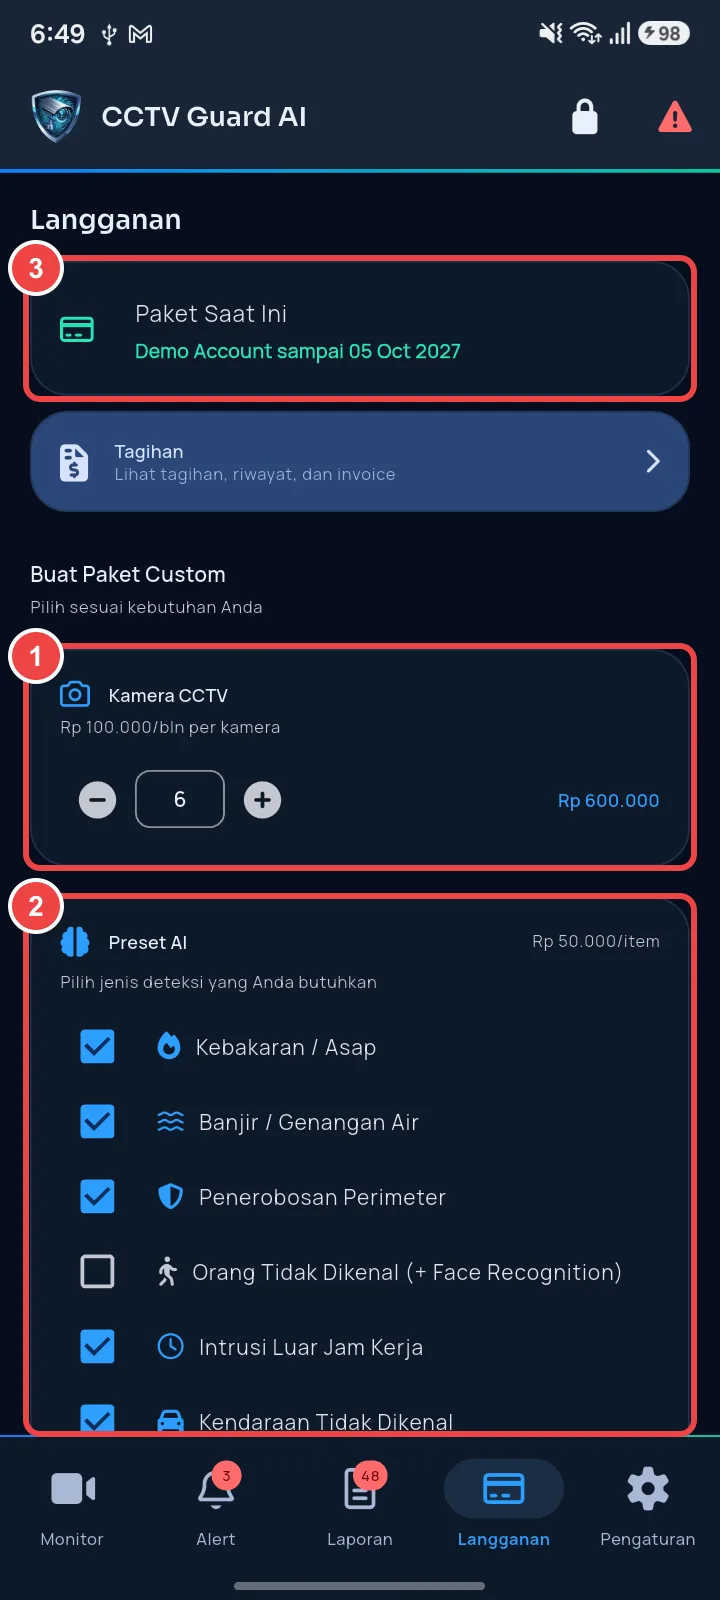
1 Open the Langganan (Subscription) tab
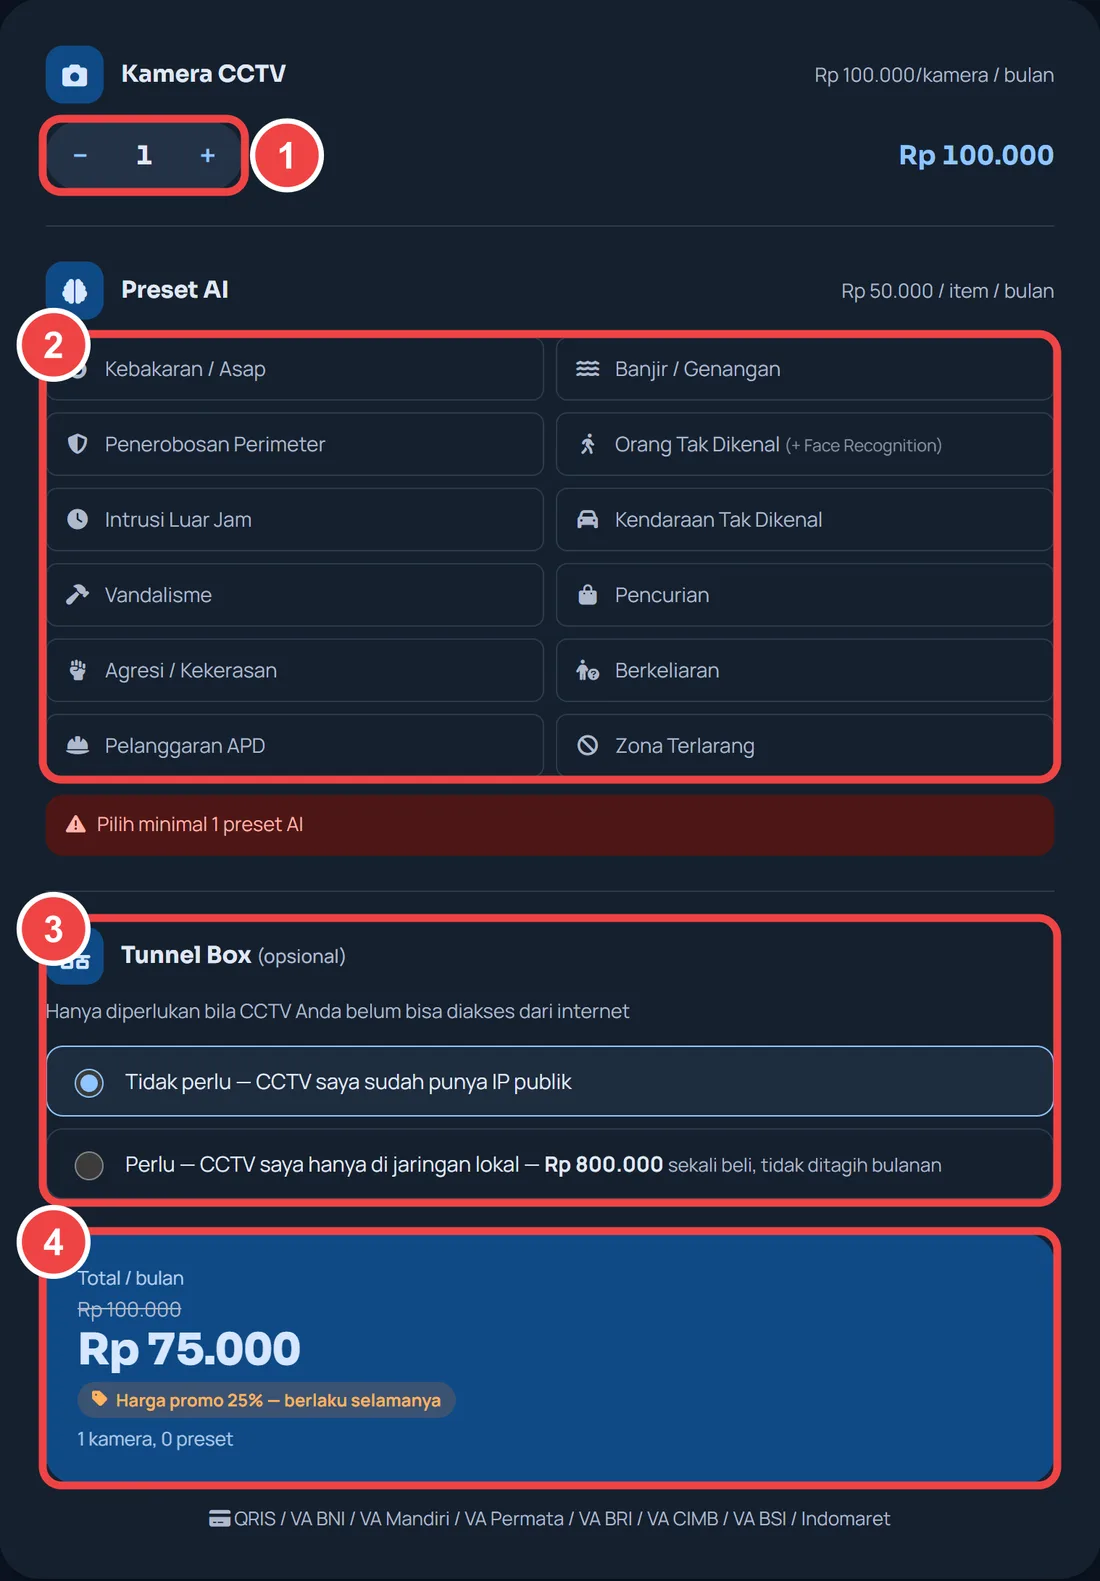
- 1 Kamera CCTV (CCTV cameras): tap + / − to set how many cameras the AI should watch.
- 2 Preset AI (AI presets): tick the detections you need, for example Kebakaran/Asap (Fire/Smoke), Penerobosan Perimeter (Perimeter Breach) or Intrusi Luar Jam Kerja (After-hours Intrusion). At least one.
- 3 Paket Saat Ini (Current Plan): your active plan and its expiry date.
2 Decide on a Tunnel Box & pay
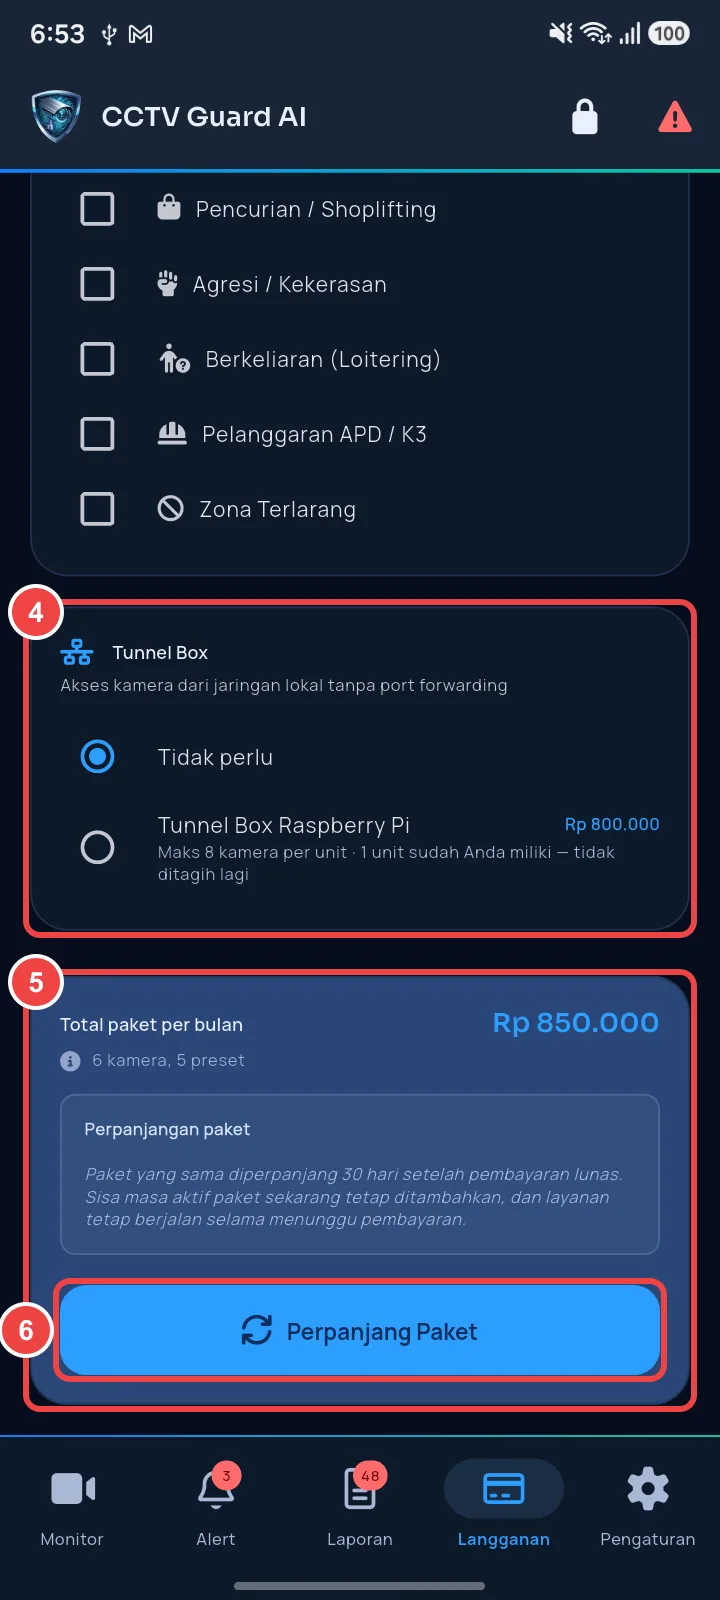
- 4 Tunnel Box: choose Tidak perlu (Not needed) if you will use port forwarding. Choose Tunnel Box Raspberry Pi if you cannot or do not want to configure your router. Not sure? Read Section 6 first.
- 5 Check the Total paket per bulan (monthly plan total).
- 6 Tap Langganan Sekarang (Subscribe Now; existing customers see Perpanjang / Upgrade Paket — Renew / Upgrade Plan), then choose how to pay: QRIS, Virtual Account (BNI, Mandiri, BRI, Permata, CIMB, BSI), or a payment code at a retail store.
Section 4
Understanding the RTSP Address
Think of your DVR as a small TV station where each camera is a channel. RTSP is the “broadcast address” of that channel. With it, our server can watch your camera, just like a TV tuned to a particular channel.
The prefix — always the same.
The DVR user name, often admin.
The DVR password, after a colon and followed by @.
Your site’s internet address (public IP or DDNS). See Section 6.
The RTSP “door”. The DVR default is usually 554.
Points to a camera/channel. Differs by brand (Section 5).
192.168.x.x or 10.x.x.x only work inside your home/office network. Our server is on the internet, so it cannot reach them. For your cameras to be monitored you need one of: port forwarding (the address becomes your public IP/DDNS) or a Tunnel Box. Both are explained in Section 6.Section 5
Finding the RTSP Details on Your DVR/NVR
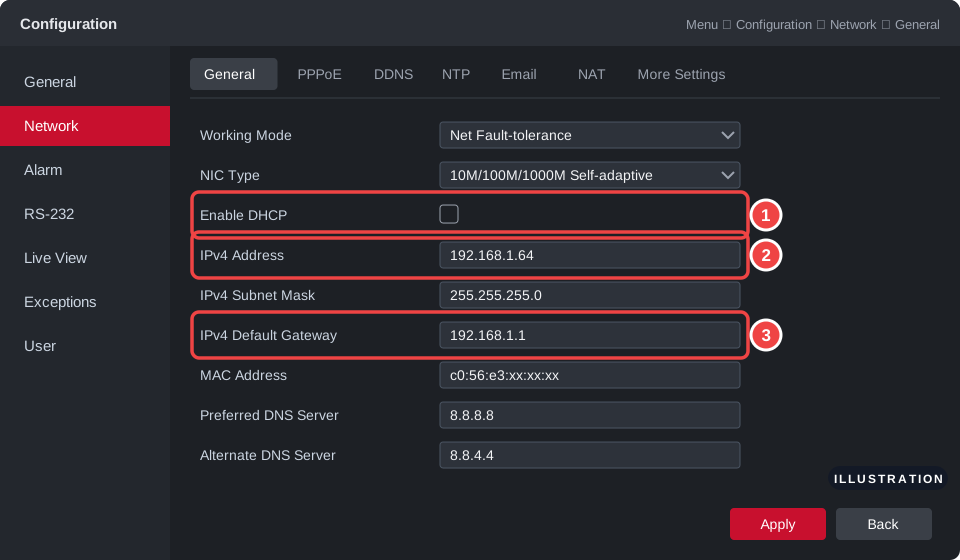
Connect a monitor and mouse to the DVR, right-click on the screen, choose Main Menu / Menu and enter the DVR password. There are 5 details to note down. Use the Worksheet at the end of this section.
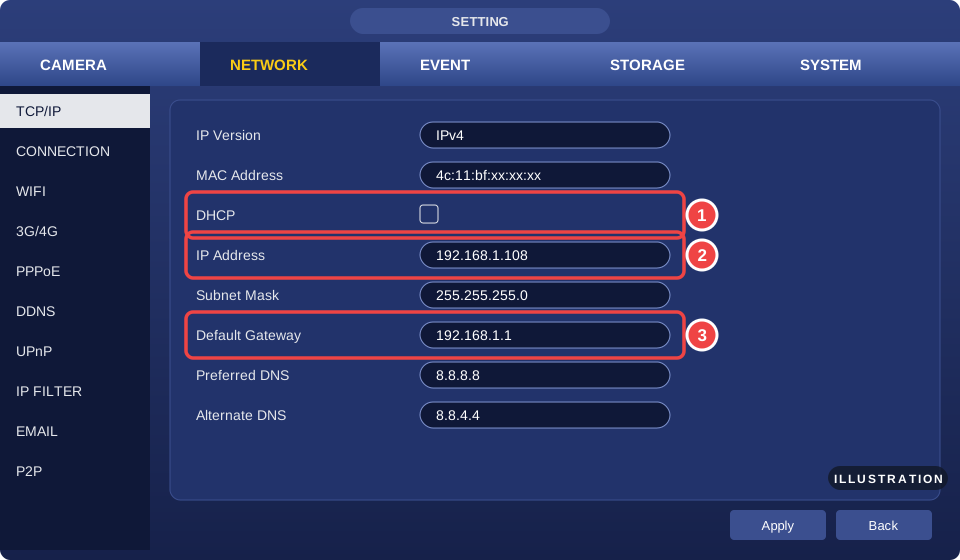
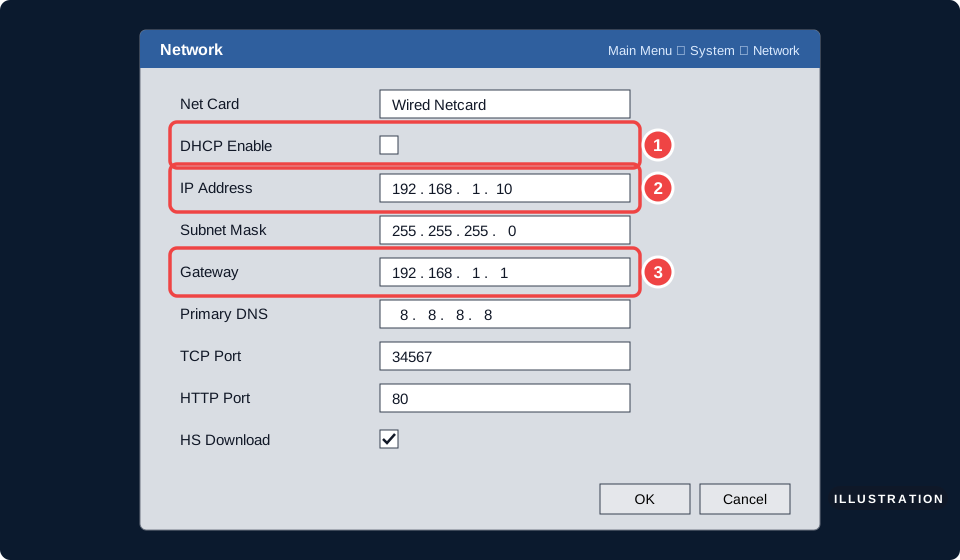
A Find the DVR’s local IP address & lock it in place
Open the Network menu, then:
- 1 Turn off DHCP (untick it) so the DVR’s IP stays fixed and does not change when the router restarts. This is required for port forwarding.
- 2 Note the DVR’s IP Address, for example
192.168.1.64. - 3 Also note the Gateway — your router’s address (for example
192.168.1.1). You will use it to open the router in Section 6. - Press Apply / Save / OK.
B DVR username & password
These are the same ones you use to open the DVR menu. The username is usually admin.
guardai) with Live View / Remote Live View rights only. Use this user for RTSP instead of admin. If you ever want to cut off access, just delete that user.@ # : / ? % — they have special meaning inside an RTSP address. Letters and numbers only is safest. If you must use them, replace them: @ → %40, # → %23, : → %3A, / → %2F, ? → %3F, % → %25. Example: the password Home@2026 is written Home%402026.C RTSP port
Usually 554, and rarely changed. To make sure:
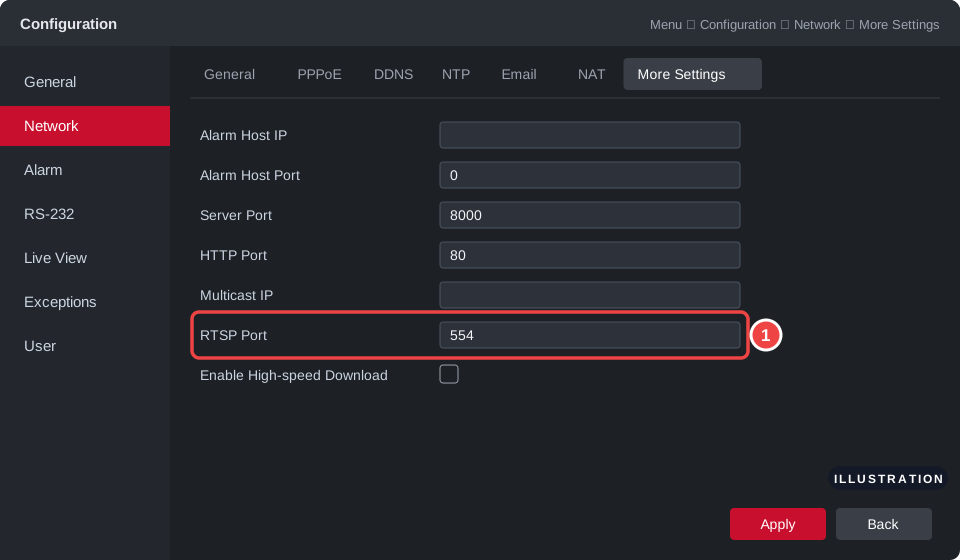
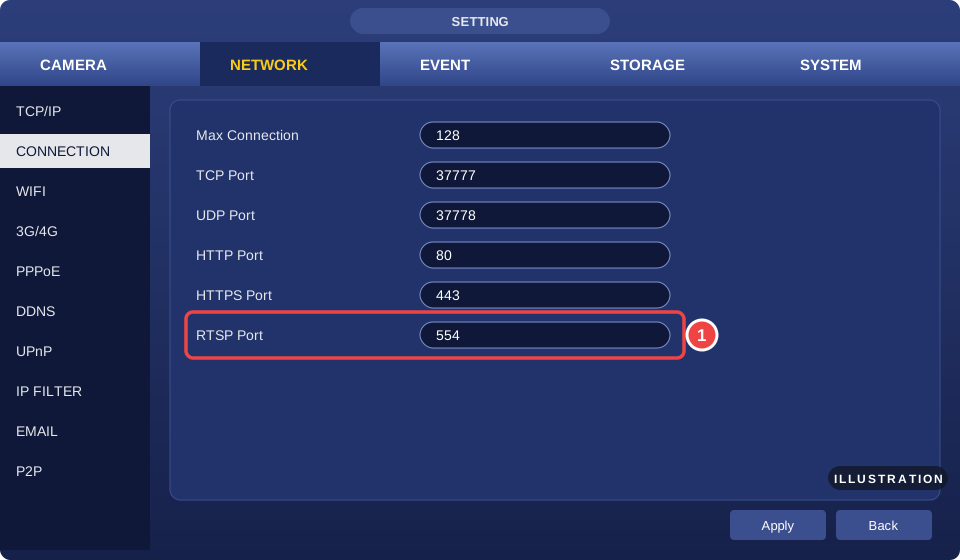
XMEye usually uses RTSP port 554. The other ports in the menu (TCP 34567, 37777, 8000, HTTP 80) are not the RTSP port — don’t mix them up.
D Path by brand & channel number
Replace USER, PASSWORD, ADDRESS, PORT and the channel number with your own details.
| DVR/NVR brand | RTSP address format | Example: camera/channel 2 |
|---|---|---|
| Hikvision, HiLook, HiWatch, EZVIZ NVR | rtsp://USER:PASSWORD@ADDRESS:PORT/Streaming/Channels/N01 | …/Streaming/Channels/201 |
| Dahua, IMOU, Amcrest, many XVRs | rtsp://USER:PASSWORD@ADDRESS:PORT/cam/realmonitor?channel=N&subtype=0 | …?channel=2&subtype=0 |
| XMEye / Xiongmai (local brands, “iCSee”) | rtsp://ADDRESS:PORT/user=USER&password=PASSWORD&channel=N&stream=0.sdp? | …&channel=2&stream=0.sdp? |
| Uniview (UNV) | rtsp://USER:PASSWORD@ADDRESS:PORT/unicast/cN/s0/live | …/unicast/c2/s0/live |
| TP-Link VIGI / Tapo (IP cameras) | rtsp://USER:PASSWORD@ADDRESS:PORT/stream1 | one camera = one address |
- Channel number = the camera’s position on the DVR screen (CH1, CH2, …, D1, D2, …). Hikvision uses
101= channel 1,201= channel 2,1601= channel 16. - Main stream vs sub stream. Main stream = full quality (Hikvision
…01, Dahuasubtype=0, XMEyestream=0). Sub stream = light quality (…02,subtype=1,stream=1). For Hikvision & Dahua, enter the main stream: our system automatically uses the sub stream for live view to save data. For other brands on a slow upload connection, use the sub stream. - Brand not in the table? Search Google for “RTSP URL [your DVR brand]”, check the manual, or contact us — we will help you find it.
E Worksheet
Print or copy this table and fill it in as you follow the steps above.
| DVR/NVR brand | |
|---|---|
| DVR local IP (Step A) | e.g. 192.168.1.64 |
| Router IP / Gateway | e.g. 192.168.1.1 |
| DVR username | |
| DVR password | keep it somewhere safe |
| DVR RTSP port | usually 554 |
| Number of cameras & channel numbers | |
| Public IP / DDNS (Section 6) | |
| Router external port (Section 6) | e.g. 5541 |
Section 6
Making Your DVR Reachable from the Internet
Our server needs to “knock on your DVR’s door” from the internet. There are two ways:
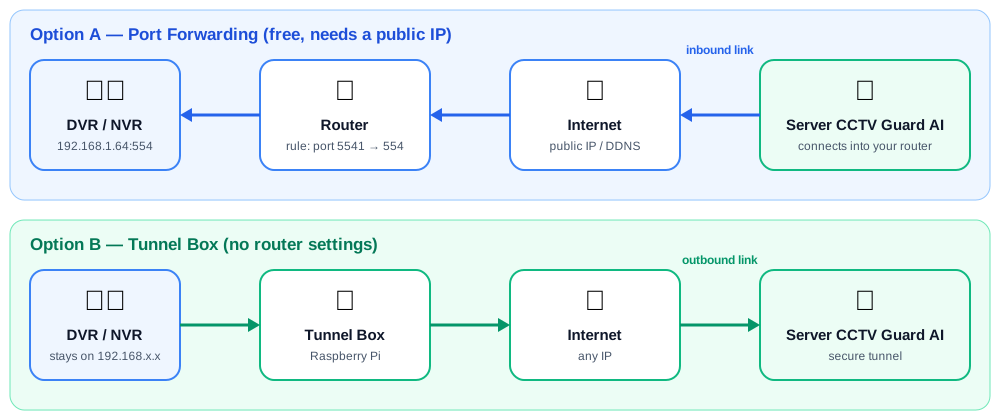
| A. Port Forwarding | B. Tunnel Box | |
|---|---|---|
| Cost | Free | Rp 800,000 one-off purchase, never billed monthly. Up to 8 cameras per unit. |
| Requirements | Your internet has a public IP & you can open your router’s settings | Just a free LAN port on your router |
| Difficulty | Moderate (router configuration) | Very easy (just plug it in) |
| Security | A DVR port is open to the internet — a strong password is a must | No ports are opened |
| Best for | People used to configuring routers / with a technician | Non-technical users, internet without a public IP |
A. Port Forwarding: step by step
1 Check whether your internet has a public IP
Port forwarding only works if your router gets a public IP from your ISP. To check:
- From a phone/laptop on the CCTV site’s Wi-Fi, open google.com and type “what is my ip”. Note the number shown, for example
203.0.113.25. - Open the router page (step 2) and look at the WAN IP. On ZTE: Status ▸ Network Interface ▸ WAN Connection. On Huawei: Status ▸ WAN Information.
- Compare the two:
You have a public IP. Continue to step 2.
10., 100.64–100.127, 172.16–172.31, 192.168.Your internet uses CGNAT (an IP shared with other customers), so port forwarding will not work. Ask your ISP for a public IP service (usually paid), or use a Tunnel Box.
2 Open your router’s settings page
- Open a browser and type the Gateway address from your Worksheet. Usually
192.168.1.1(ZTE, TP-Link) or192.168.100.1(Huawei). - Enter the router username & password, usually printed on the sticker under the modem.
3 Create a port forwarding rule
Look for a menu called Port Forwarding, Port Mapping, Virtual Server or NAT. Create one new rule:
| Router field | Fill in | Example |
|---|---|---|
| Name | anything | CCTV-RTSP |
| Protocol | TCP | TCP |
| External / WAN port | any number 1024–65535, preferably not 554 | 5541 |
| Destination IP / LAN Host / Internal host | the DVR’s local IP (Section 5A) | 192.168.1.64 |
| Internal / LAN port | the DVR’s RTSP port (Section 5C) | 554 |
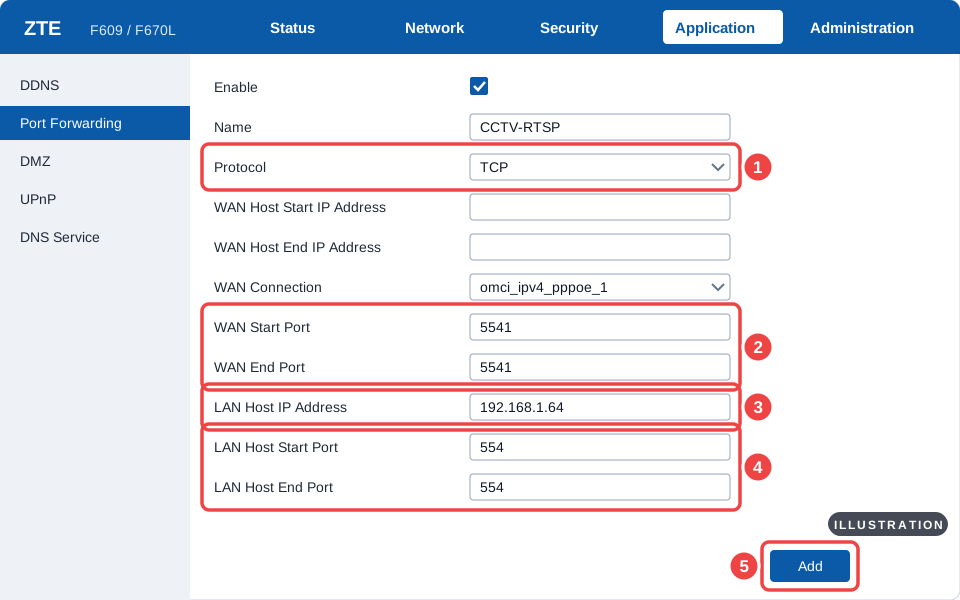
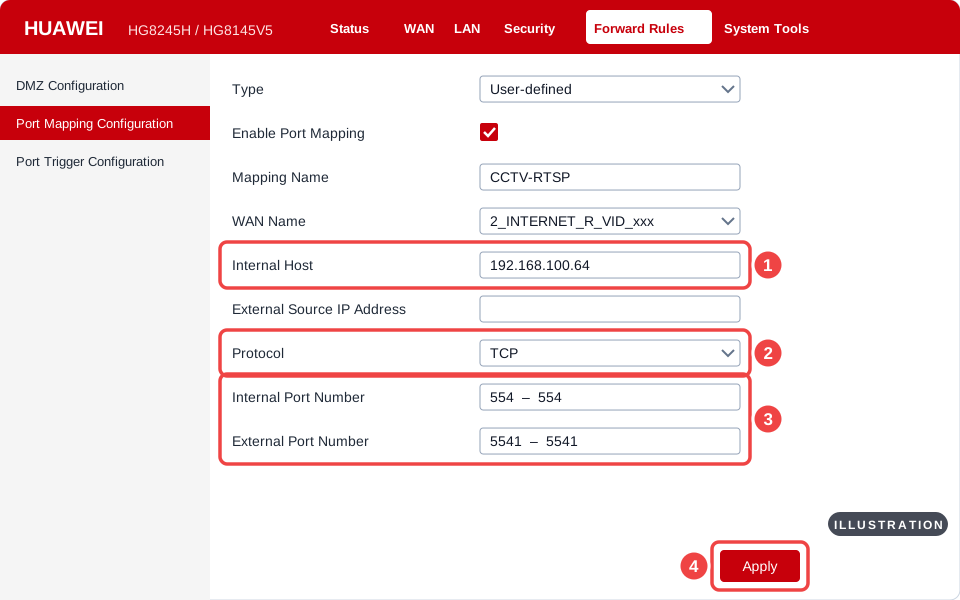
Other routers: TP-Link → Advanced ▸ NAT Forwarding ▸ Virtual Servers. FiberHome → Application ▸ Port Forwarding. Mercusys / Tenda → Advanced ▸ Port Forwarding / Virtual Server. One rule covers all cameras on one DVR, because channels are told apart by the path, not the port.
4 Deal with a changing IP (DDNS)
Home public IPs usually change when the modem restarts. To keep your RTSP address working, choose one:
- DDNS (free): register a name such as
myshop.ddns.netwith a DDNS service (for example No-IP), then enter it in the DDNS menu of your router or DVR. Use this name as the ADDRESS in RTSP. - A static IP from your ISP (paid). The address never changes.
5 Put your RTSP address together
Combine the details from your Worksheet. Use the public IP / DDNS and the external port, not the local IP:
B. Tunnel Box: no router configuration
The Tunnel Box is a small device (Raspberry Pi) that builds a secure tunnel from your network to our server. The connection goes out from your site, so you need no public IP, no port forwarding and no DDNS.
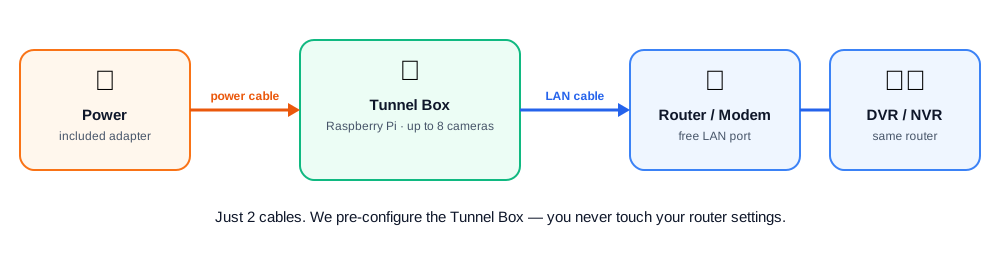
- Order a Tunnel Box in Langganan (Subscription) — Section 3, option 4. One unit covers up to 8 cameras.
- Send your DVR details to our team on WhatsApp: brand, local IP, RTSP port, username & password (preferably a dedicated user) and the number of cameras.
- We ship the Tunnel Box pre-configured. Plug it into power and connect a LAN cable to the same router as the DVR.
- Our team registers the cameras on your account and they appear on the Monitor tab. Go straight to Section 9.
Section 7
Testing the RTSP Address with VLC
Before entering it in the app, make sure your RTSP address is right. If the video plays in VLC, it will almost certainly play in CCTV Guard AI too.
1 On a computer
- Download & install VLC media player from videolan.org (free).
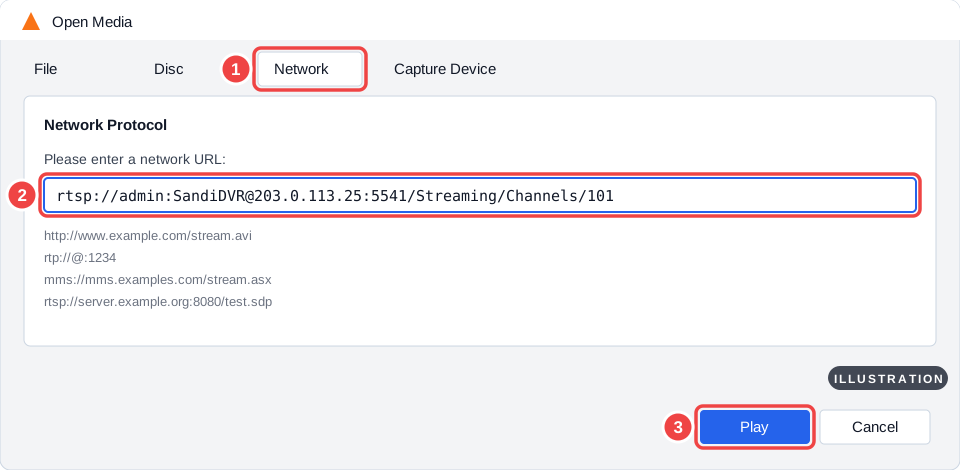
- Open Media ▸ Open Network Stream… (or press Ctrl+N). The Network tab 1 opens.
- Paste the RTSP address 2 and press Play 3.
2 Test from OUTSIDE the network
The most honest test is from outside the CCTV site, because our server is outside too. Install VLC for Android on your phone, turn off Wi-Fi and use mobile data, then go to Browse ▸ New stream and paste the RTSP address.
| Result | What it means |
|---|---|
| Video plays | The address is correct. Continue to Section 8. |
| Asks for username/password again | Wrong username/password, or the password contains symbols (see Section 5B). |
| Plays on Wi-Fi, fails on mobile data | Port forwarding is not right yet, or your internet uses CGNAT (Section 6A, step 1). |
| Black screen / “Your input can’t be opened” | Wrong path or channel number, wrong port, or the DVR is off. |
Section 8
Adding Cameras to the App
Make sure your plan is active (Section 3) and your RTSP address passed the VLC test (Section 7).
1 Tap “Tambah Kamera” (Add Camera)
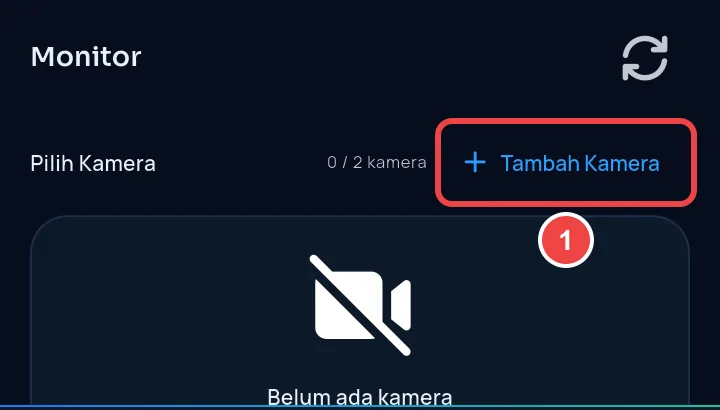
On the Monitor tab, scroll to the camera list and tap + Tambah Kamera (Add Camera) 1. The number next to it, for example “0 / 2 kamera”, is your plan’s camera quota.
2 Fill in the camera form
- 1 Nama Kamera (Camera name): an easy-to-recognise name, for example “Front Porch” or “Back Warehouse”.
- 2 URL RTSP: paste the complete RTSP address you tested in VLC. It must start with
rtsp://. - 3 Lokasi (Location, optional), for example “1st floor”.
- 4 Tap Simpan (Save).
…:554/Streaming/Channels/201. An address copied from a truncated display, such as …:554/Streamin..., is not recognised by the DVR and causes “Gagal memulai stream” (Failed to start stream).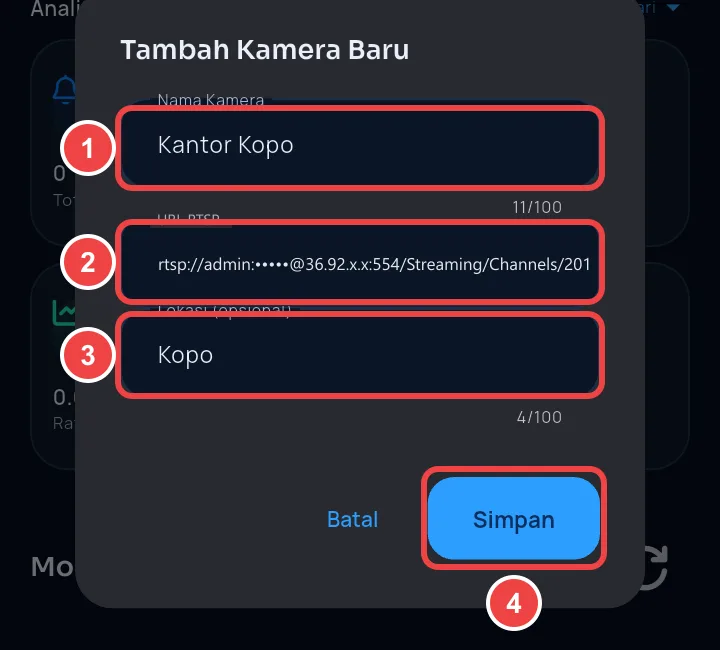
3 Check the result
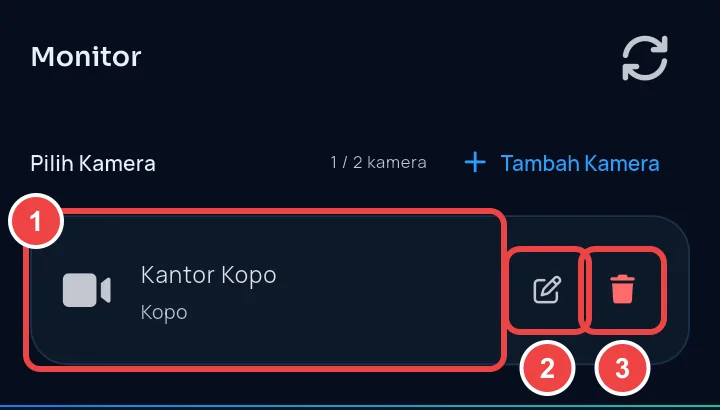
The new camera appears in the list 1. Tap its name to open live view (Section 9). If no video appears, see Section 10.
- 2 Pencil icon (Edit): change the name, RTSP URL or location. Use it when the DVR password or DDNS address changes.
- 3 Bin icon (Delete): remove the camera.
Repeat steps 1–3 for each camera. On the same DVR you usually only need to change the channel number in the RTSP address.
Section 9
Everyday Use
Live view
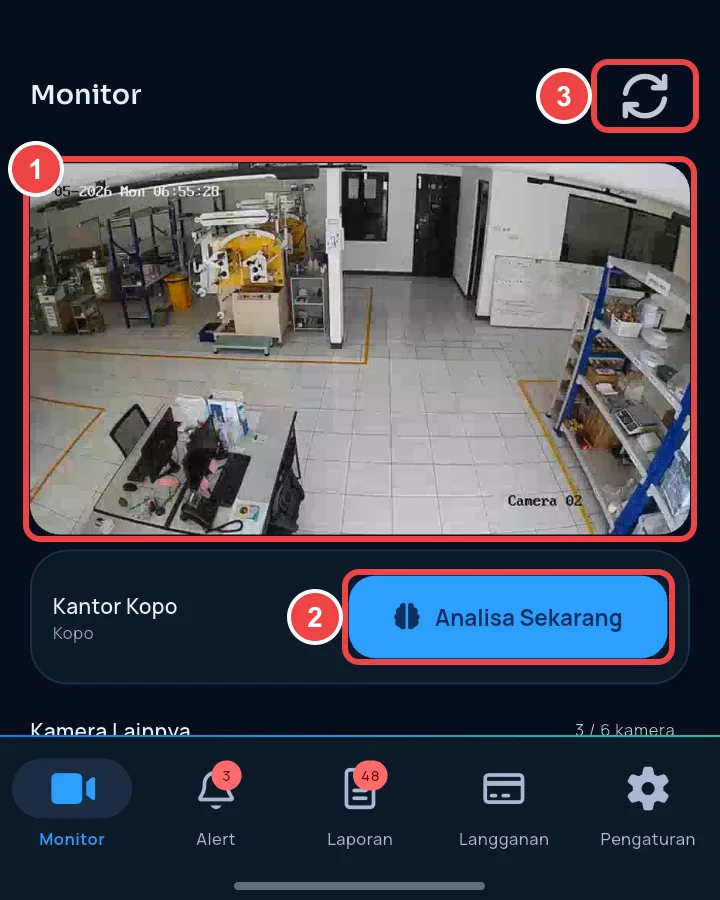
Tap a camera name on the Monitor tab:
- 1 Live video from the camera.
- 2 Analisa Sekarang (Analyse Now): ask the AI to check the current picture straight away.
- 3 Reload if the video stalls.
Alerts
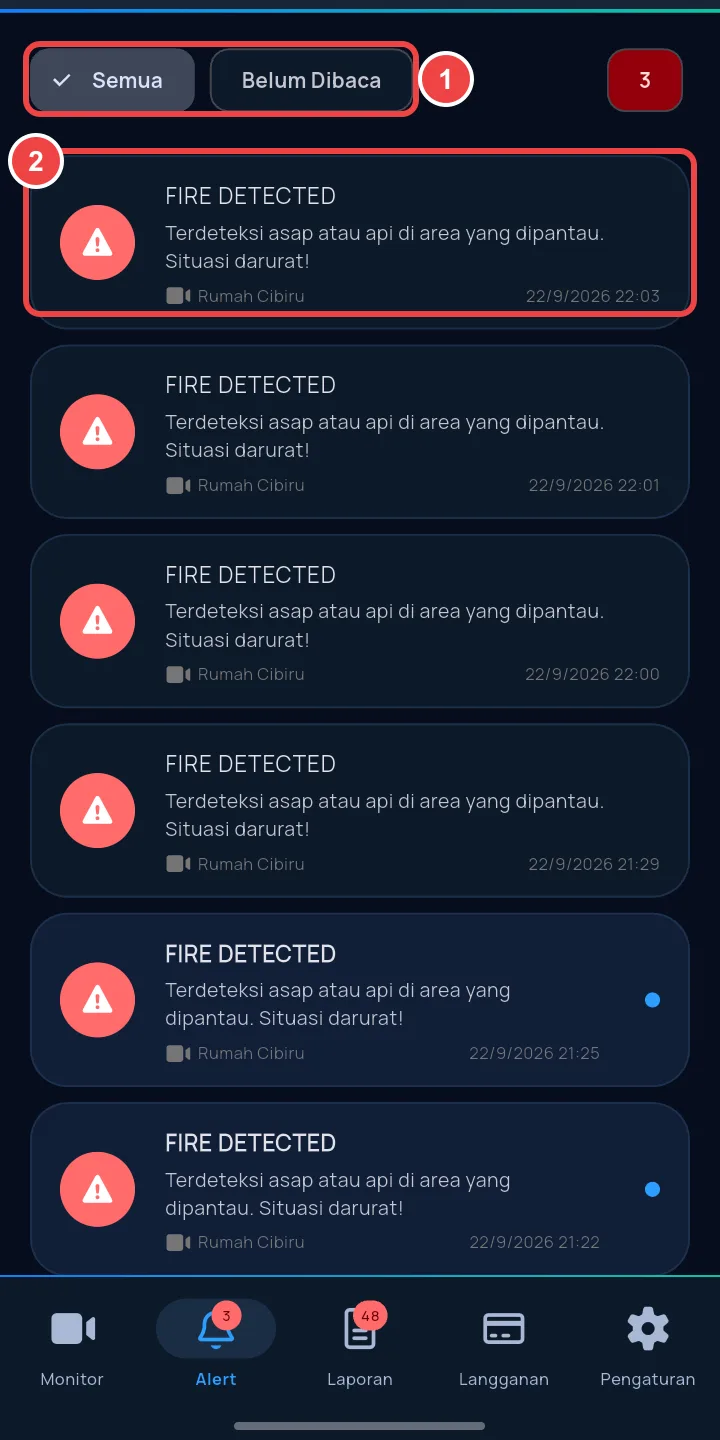
Every event the AI detects appears on the Alert tab and is sent as a notification.
- 1 Filter by Semua (All) or Belum Dibaca (Unread).
- 2 Tap an alert to see its details, replay the event recording, download it or share it.
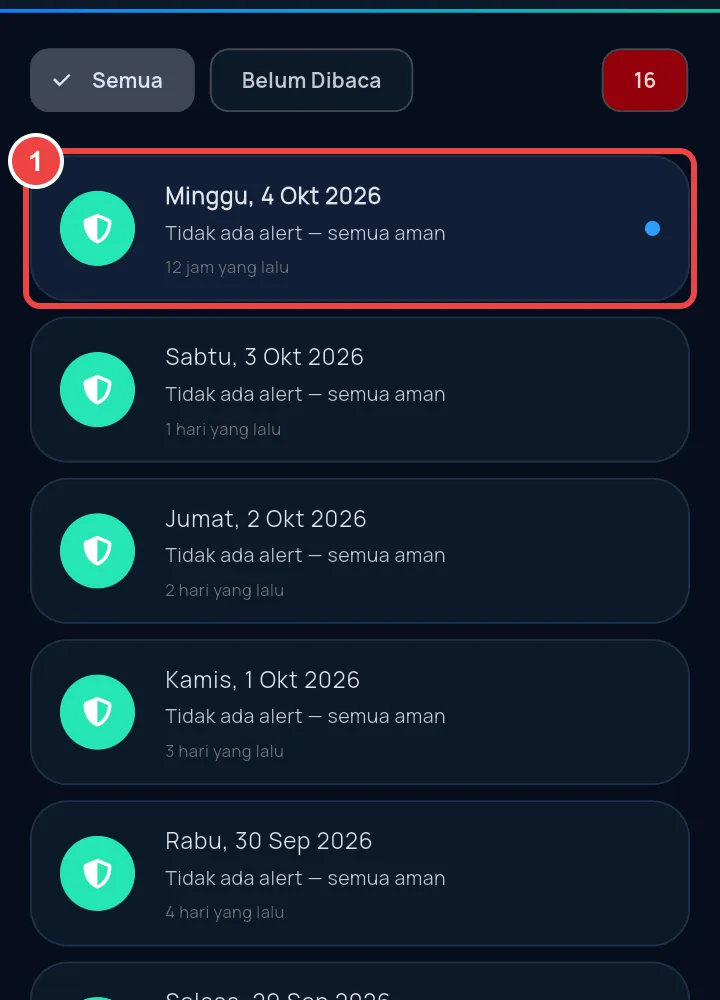
Daily reports
The Laporan (Reports) tab has a summary for each day, for example “Tidak ada alert — semua aman” (No alerts — all clear).
Important settings
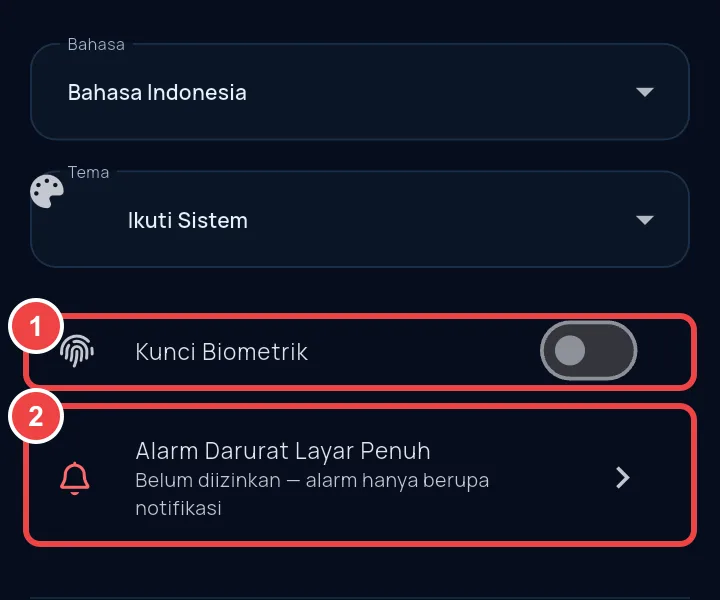
- 1 Kunci Biometrik (Biometric Lock): the app only opens with your fingerprint/face.
- 2 Alarm Darurat Layar Penuh (Full-Screen Emergency Alarm): strongly recommended. Tap it and allow it, so critical events (such as a fire) sound an alarm and wake the screen even when the phone is locked.
The top-right corner has two buttons: Brankas Bukti (Evidence Locker) to keep important recordings, and SOS for emergencies.
Section 10
Common Problems & Solutions
| Symptom | Likely cause | Solution |
|---|---|---|
| “URL harus diawali rtsp://” (URL must start with rtsp://) | Address pasted wrongly or a space in front | Clear the field and paste the full address starting with rtsp://. |
| “Gagal memulai stream. Cek RTSP URL atau jaringan.” (Failed to start stream. Check RTSP URL or network.) | Path cut off or wrong (for example the address ends at :554/), a local IP 192.168.x.x was used, port forwarding is not right, or the DVR is off | Open the pencil icon and check the address to the very end (Section 5D). Make sure you use the public IP/DDNS + external port (Section 6), then test over mobile data (Section 7). |
| Used to work, now no video | Public IP changed, DVR password changed, or the DVR IP changed because of DHCP | Use DDNS, turn off DHCP on the DVR (Section 5A), then update the URL with the pencil icon. |
| Choppy / slow video | Low upload speed at the site, or many cameras on main stream | For brands other than Hikvision/Dahua, switch to the sub stream. Check your upload speed with a speed test. |
| Black video with no error message | The camera on that channel is off or the channel number is wrong | Check the camera on the DVR screen. Match the channel number (Section 5D). |
| Forgot the DVR password | - | Reset it via the DVR’s “Forgot password” menu, or contact your DVR technician/distributor. |
| “Tambah Kamera” (Add Camera) button greyed out | Camera quota used up or plan not active | Add cameras or activate your plan on the Langganan (Subscription) tab. |
| No notifications | Notification/alarm permission not granted, or battery saver mode | Turn on the Full-Screen Emergency Alarm (Section 9) and allow notifications for the app. |
Section 11
Need Help?
Our team is happy to help — including finding the RTSP address for your DVR brand or walking you through port forwarding remotely.
When you contact us, mention your DVR brand and your VLC test result (Section 7). Never send your DVR password over public social media.
CCTV Guard AI · PT Indo Smart Media · User Guide, October 2026 edition